Polish Concrete
Concrete
Preferred Mix Design Specs
- 3500 psi minimum
- Pozzolans— No more than 20% cement replacement (fly ash or slag).
- Admixtures— in moderation, generally speaking admixtures are ok for use with polished concrete.
- No air entrainment 2---3% allowed
- Lightweight Concrete: not recommended, and not allowed if aggregate exposure is required.
- Preferred Flatwork Finishing Specs
- Preferred Floor Flatness (FF) of 50+
- Preferred Floor Levelness (FL) of 35+
- Alternative to FF/FL is the strike---off method:
- 0"–1/8" is favorable
- 1/8"–1/4" is wavy/unfavorable
- Screed (vibratory), bull---floated, bump cut, smooth: pan---finish methodically N/S then E/W until tight
and flat from edge to edge, with no rough areas.
- Combination blades N/S then E/W. Do not over trowel.
- Plastic or Teflon blades are preferred over Steel blades for final passes N/S then E/W. Do not over trowel.
- Do not burn black when power troweling (use Teflon or plastic)
- No Trowel marks, or indentions left on surface (ex: knee marks, shoe prints)
Concrete Finishing Recommendations prior to ArmorFloor being installed:
- Finished Surface Flatness and Levelness: The best finish is a Laser level / screed process
- a) Tolerances for Hardened/Densified/Polished Interior Floor Slabs: Specified Overall
Value (SOV) FF 50 / FL 35 and Minimum Local Value (ML V) FF 33 / FL 24 tolerance for
troweled floors in accordance with ACI
**Tell the finishers that this concrete is going to be ground and polished. Tell them to push down the
aggregate and pull up the fines when troweling. This will help eliminate uneven aggregate exposure
during the initial grind.
Floor Test Slabs: Mock up (if time allows)
- Prior to the Pre---Slab Installation Conference construct a permanent test Slab.
- Accepted test slab will be established as a minimum basis for acceptance of final slabs.
- Work shall not begin on final areas until an ability to satisfy specified tolerances and other
requirements routinely in test areas has been demonstrated.
- Use same materials, tools, and methods for finishing and curing final slab work as used for test slab.
Include joints and semi---rigid joint filler.
Curing the Concrete
- Wet Cure: Minimum 3---day’s water cured and 7 days to air dry
- a) UltraCure ultracure.net(this is the preferred method).
- b) Wait at least 10 days before starting to grind after water curing.
- Water Based Dissipative Cure should be used then wait 14 days minimum
The Retro Plate Architectural Polished Concrete System has been developed
Specifically to address and eliminate the significant fragmentation and inconsistencies in the Concrete Polishing Industry by providing the only engineered, fully integrated and warranted system on the market. Retro Plate provides consistent process repeatability and performance, which is managed, designed and detailed using custom specifications by leading experts in the industry and installed by our certified installers at Master Applications, Inc .
Engineered System: Equipment, Diamond Tooling, Treatments and Maintenance products have all been designed as a unified system to provide repeatable, high quality Polished Concrete Floors that are warranted for performance.
Integrated Program: Detailed specifications, engineered products and a certified Installation network of Concrete Polishers all working in unison to assure the satisfaction of our clients.
Color Options: Helix Color is a Water Based, Micronized Pigmented Dye developed for polished concrete and toppings, and to meet today’s stringent green standards.
Concrete Topping: Rapid Cement is a polishable concrete topping product specially designed and engineered to resemble and perform like Polished Concrete.
Specification Services: Retro Plate currently offers an extensive library of over 20 detailed specifications that are readily available, or can assist our clients in addressing their specific needs on projects.
Local Resources: Retro Plate brand polished concrete is supported by Master Applications & A Team of local architectural, technical and installation experts to serve our client’s polished concrete retail construction needs nationwide.
Warranty: Due to its fully engineered and integrated program, Retro Plate & MAI are the only combined Concrete Polishing System on the market today that offers a Floor Performance Warranty of the following.
See Below Warranty
Step One: Choose Your Grade
The Grade of the floor represents the amount of aggregate that will be exposed at the surface.
The higher the Grade, the greater the amount of aggregate showing.

GRADE 1 - Light Sand Finish
The Grade 1 light sand exposure is a ground and polished surface, typically exposing only the sand particles in the concrete floor. The Grade 1 finish is considered a "creamy looking" surface and is the most popular choice for Architectural Ground & Polished floors.

GRADE 2 - Salt & Pepper Finish
The Grade 2 Salt & Pepper exposure is a ground and polished surface, typically exposing a spattering of aggregate in the concrete floor. The Grade 2 finish is most often chosen to give the appearance of an aged surface.

GRADE 2 - Salt & Pepper Finish
The Grade 2 Salt & Pepper exposure is a ground and polished surface, typically exposing a spattering of aggregate in the concrete floor. The Grade 2 finish is most often chosen to give the appearance of an aged surface.
Step One: Choose Your Class
The Class of the floor represents the amount of reflectivity or shine that will be visible at the surface.
The higher the Class, the greater the amount of reflectivity or shine.

CLASS 1 - Low Reflectivity, 400 grit
The Class 1 finish (specified as 400 grit) results in a surface that exhibits a low level of specular reflectivity. After being polished to a 400 grit level, the Polished Concrete System Class 1 finish delivers a relatively low gloss reading.
Simply put, this is the least shiny floor option.

CLASS 2 - Medium Reflectivity, 800 grit
The Class 2 finish (specified as 800 grit) results in a surface that exhibits a moderate level of specular reflectivity, approaching a mirror-like surface. After being polished to an 800 grit level, the Polished Concrete System Class 2 finish delivers a medium level of gloss.
This floor will exhibit shine but not a clear mirror-like reflection.
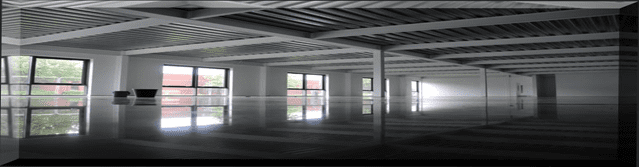
CLASS 3 - High Reflectivity, 1500 grit
The Class 3 finish (specified as 1500 grit) results in a surface that exhibits a high level of specular reflectivity and the most mirror-like surface. After being polished to a 1500 grit level, the Polished Concrete System Class 3 finish delivers a high level of gloss.
Bonded Abrasive Polished Concrete ( Fully Mechanical) is a multi-‐step operation of
mechanically grinding, honing, and polishing a concrete surface with each grit of bonded abrasives cutting and refining to the maximum potential to achieve the specified level of finished gloss. This process uses concrete grinding equipment that is both counter-‐rotating and planetary. Chemical treatments are used to produce a dust proof, durable, stain resistant, light reflective and easy to maintain surface.
NOTE-‐ This operation yields the most durable finish and requires less maintenance than Hybrid or Burnished polished concrete.
Hybrid Polished Concrete is a multi-‐step operation that uses both standard grinding and polishing equipment (3 Steps) and Micro Polishing equipment. This process combines the mechanical grinding honing and polishing process with the friction rubbing process to achieve the specified level of finished gloss. Chemical treatments are used to produce a dust proof, durable, stain resistant, light reflective and easy to maintain surface.
NOTE-‐ This operation yields a less durable finish and requires more maintenance than Bonded Abrasive polished concrete.
Burnished Polished Concrete is a multi-‐step operation of mechanical friction-‐rubbing of a concrete floor surface using Micro Polishing Pads used with the propane micro polisher to achieve a specified level of finished gloss. chemical treatments are used to produce a dust proof, durable, stain resistant, light reflective and easy to maintain surface CONTACT: Robert Holmes (410) 726-3298 Robert@MasterApplications.com
NOTE-‐ This operation yields a less durable finish and requires more maintenance than
Bonded Abrasive or Hybrid polished concrete.
ArmorX FAST Trowel Polished Concrete System
HOW DO WE SAVE YOU MONEY?
ArmorX TROWEL FAST POLISH SYSTEM Traditional Grinding System
100,000 SqFt 100,000 SqFt
7 Step Process 7 Step Process
Man Power 4 Men Man Power 4 Men
2 x 48” Ride on Power Trowels 3 x 32” Planetary Grinding Machines
7 Working Days 33 Working Days
HOW MUCH CAN WE POLISH IN A DAY?
8 Foot Power Trowel 6 Foot Power Trowel Traditional Grinding
ArmorX PRO POLISH ArmorX PRO POLISH ArmorX PRO POLISH
7 Step Process 10,000 SqFt 7 Step Process 7,000 SqFt 7 Step Process 1,000 SqFt
ArmorX HYBRID POLISH ArmorX HYBRID POLISH ArmorX HYBRID POLISH
4 Step Process 16,000 SqFt 4 Step Process 11,000 SqFt 4 Step Process 1,600 SqFt
ArmorX – PRO GLOSS
7 Step Process
- High Performance & Visually appealing
- High gloss & ‘Salt and Pepper’ Finish
- For New & Older Floors
ArmorX – Satin Sheen
5 Step Process
- Satin gloss
- Light ‘Salt & Pepper’ Finish
- For New & Older Floors
ArmorX – Hybrid Luster
4 Step Process
- Shiny & unique ‘Cloud-Like’ Finish
- For New Floors
- Low or No Exposed Aggergate
All floors come with a 10 year floor warranty
Ask about our lifetime warranty flooring should you be looking for a lifetime flooring option
Robert Holmes Robert@Masterapplications.com (410) 726-3298 Call For Free Survey
Elimination of Dusting from Efflorescence In ordinary unpolished concrete, tiny particles of dust are pushed to the surface through an upward force called hydrostatic pressure, resulting in efflorescence. Efflorescence leads to dusting, which forces epoxies off of the surface of concrete floors and can make maintenance a costly priority.
Longer life-cycle savings: Polished floors are extremely durable and do not need to be replaced.
Easy to clean: Unlike tiles and carpet there are no grout joints or fibers to attract dust and allergens.
Cost savings: Using the existing slab as the finished floor is more cost effective and maintenance costs are lower. Maintenance is easier since all areas are one continuous surface.
High resistance to foot traffic: Concrete floors are a very hard wear surface and can stand up to the everyday wear and tear of retail or even industrial work spaces.
Less maintenance and longer service life: Polished floors are easy to clean, requiring only occasional damp mopping or floor maintainers with a neutral based cleaner. They eliminate the need for messy waxes or coatings as well as the expenses involved in applying them. Mechanically polished concrete resists the marks of forklift truck tires and staining from oil and chemical spills.
Resistant to moisture transmission issues: Polished concrete allows the floor to breathe and eliminates issues that arise with other flooring materials that seal off the concrete, such as Paint, Vinyl tile etc.
High light reflectivity: Important for facilities that want to project a bright, clean, professional image. Also saves energy by reducing artificial lighting requirements & increase the reflectivity of the light about 10-30% while also increasing the ambient lighting. This makes it possible to take advantage of more daylight and to save on the electric energy.
Health Benefits of Polished Concrete: Polished concrete is an excellent flooring choice for those who suffer of asthma or other respiratory diseases, it is Dust Free and reduces the moisture vapor that causes indoor air pollution. All our floors are hardened with lithium silicates, all natural, no VOC elements. Our choice is Organic Chemistry, that’s part of the reasons why polished concrete is green.
Slip Resistance:The only standard that currently exists for measuring the SCOF (Standard Coefficient of Friction) of walkway surfaces in the field is Standard B101.1 ANSI/NFSI. This is a standard for measuring the wet SCOF of hard surface flooring in the field using a properly calibrated and approved tribometer. OSHA does not have a standard to measure floor slip resistance, nor does the ADA (Americans with Disability Act). The NFSI is the ONLY publisher of a standard for floor traction in the U.S. The NFSI has a list of certified polished concrete products .
Cost Savings of Polished Concrete It’s important to think past the initial cost, instead considering the total lifecycle cost. Polished concrete has the longest lifecycle cost of any other floor covering or topping on the market today.
LEED Friendly Polished concrete not only utilizes existing concrete surfaces, eliminating additional materials such as coverings/coatings and moving towards sustainable building, it typically contains no noticeable VOC’s, making it friendly for any USBG LEED project.
Improved condition for old floors (Mechanical Polish Only) As concrete ages, surface stress, delamination, curled cold joints and other problems can arise. Mechanically grinding the floor will remove the top surface of the old concrete and polishing will then strengthen it, increasing its impact and abrasion resistance.
Lower Replacement Cost Compared to its alternatives like VCT and Carpet the installation cost are relatively equal but the replacement cost so significantly different with polished concrete than any other flooring, because it it’s maintained properly, it can virtually last forever.
Standard Warranty -
- 10 year Dust Proof Warranty
- Peace of mind for long-term floor consistency
- On-site training of customer's cleaning personnel
- Maintenance guidelines for daily floor cleaning
- Customer service 24/7 direct call access
Advance Warranty – Concrete Polishing System
- 15 year Dust Proof Warranty
- Guaranteed Minimum Gloss Reading of 30+ for Three Years
- Peace of mind for long-term floor consistency
- On-site training of customer's cleaning personnel
- Maintenance guidelines for daily floor cleaning
- Customer service 24/7 direct call access
*Must use ArmorX pads and cleaner for eligibility
Lifetime Warranty
- 50 year Dust Proof Warranty
- Guaranteed Gloss within 10% of Original Finished Floor Gloss Reading for Five Years
- Peace of mind for long-term floor consistency
- On-site training of customer's cleaning personnel
- Maintenance guidelines for daily floor cleaning
- Customer service 24/7 direct call access
*ArmorX pads and cleaners are provided and required to maintain eligibility with maintenance progrsm
Your new ArmorX Polished Floor has a density, hardness, and appearance like no other floor of its kind. While many people try to copy our floor, it is never duplicated. With the proper care, your floor will last a lifetime. But, like anything else, your polished Floor will need a little attention from time to time to make sure it’s holding up against the demands you place on it. Just like anything else, regular maintenance for your floors is a must if you want them to stay in good shape. Every type of floor needs regular maintenance. Fortunately, your polished concrete floor needs less than most. There are three key ingredients to keeping your floor in tip top condition: Cleaning, Re-Burnish/Re-New & Testing.
One thing is for sure, nothing is maintenance free and that goes for polished concrete floors as well. Originally sold as a maintenance free flooring choice, the polished concrete market has realized that this just isn’t the case. Polished concrete maintenance programs are extremely important and have been grossly neglected in the retail & industrial market. Don’t get me wrong, these floors are extremely low maintenance when compared to their rival in the commercial flooring segment, VCT (vinyl composite tile). In fact, if you understand the product (concrete floors), cleaning polished concrete is pretty easy, but understand, it isn’t the same as cleaning your garage floor.
I have witnessed firsthand the efficiencies polished concrete floors create for retailers, especially busy ones that operate 24 hours a day, and the enormous benefit they provide to not only store operations, but the yearly maintenance expenses….if done right.
First, let’s understand that concrete is more like maintaining stone than it is maintaining products with wax. Concrete is a refined product…. just like the granite counter top you might have in your kitchen. This in and of itself changes the approach of maintenance…. abrasives break down the “shine” as opposed to lack of chemical waxes.
Now that we understand that concrete isn’t just another floor that you have your maintenance company clean, here are four tips to consider as an owner or a cleaning company getting ready to establish a maintenance program for polished concrete floors.
- Have a meeting
- Have a “pre-cleaning” meeting with both personnel and maintenance professionals so everyone is on the same page. There is a ton of important information for everyone to discuss to make life easier for both parties. Make sure that all responsible parties are involved in this meeting. The plant manager (or night manager), the in house janitorial crew, the polished concrete maintenance service provider manager, crew, etc. Instead of just sitting around a table with everyone
itching to get on with their day, order some pizza and make it more of a social event. Discuss key situations to the flooring maintenance programs success. Some examples are;
- When are the nights you have to do some extra maintenance on details?
- How long can maintenance occupy an area? (remember, there is no stripping and waxing like a VCT floor so areas aren’t tied up for too long)
iii. Where is cleaning going to start in the facility? The important thing to establish is that both the facility employees and maintenance are on the same team.
- Who has the ‘right of way’ when an area is in need to be cleaned?
- 2. Find out who originally installed the polished concrete floor
- What types of products did they use when it was polished? Essentially what you would want to find out is what densifier product was used during the install and if the floor had a guard product or stain protector applied. It would be ideal to follow your daily cleaning procedures with the same line of products from the original manufacturer of products applied during install. It also says to the concrete polisher (original installer), and chemical manufacturer that you have the foresight to see the floor through as recommended and not fall for some new “magic juice”. Did you notice I said “daily cleaning”. Polished concrete floors need cleaned every day, just like any other floor. Back to my analogy of a granite countertop….you wouldn’t want people walking all over your granite top if there were small sand particles on it. We both know what would eventually happen. I can’t say that I have been walking on any countertops lately, but have certainly seen the former.
- 3. Get trained for proper polished concrete maintenance procedures
- If you are trying to maintain polished concrete floors in house or even if polished concrete flooring is a new surface for your floor maintenance provider, take the time to train. I wish I could say it as simple as getting behind an auto scrubber, but it’s not. The typical janitorial service provider and building owner thinks they can run an auto scrubber over the floor and call it good. ‘It’s just concrete’ right? Wrong! The installer had to go through all kinds of trainings and be certified in various chemical procedures to install the floor, the same standards should be in place for the maintenance personnel. (If you’re having maintenance done ‘in house’, I have developed a great training program that Mr. Clean can provide for your employees).
- Develop a polished concrete flooring maintenance plan
- The real key to the maintenance plan is to stay on top of it. Don’t let the floor get what I call ‘cattle paths’ down the middle from excessive wear.
- One easy way to track if the polished concrete floor is maintaining is sheen is to use a 60-degree gloss meter. This meter will show the reflectivity/gloss of a given surface. I have found that a gloss of over 40 and above is sustainable with proper maintenance. Don’t’ just take one reading in an area, take 5 in a given area, throw out the low and the high reading, and average the remaining three. Track the areas you take the readings and do this on a consist ant basis to track the floor maintenance effectiveness.
- A way to visually tell if you have good floor clarity is to look down at the floor about 5 feet in front of your shoes. If you can see the image of the light bulbs from the ceiling in the floor, you have good clarity remaining. On the other hand, if you see a real ‘fuzzed out’ bulb, and can’t really tell if it’s one incandescent bulb, or two as you look into the floor, you are letting the floor deteriorate too much.
iii. The more you let the floor go, the more it cost to bring it back. Also, it’s not like you have a lot of chances, the ‘past layer’ of concrete is very thin (1/32” many times) and after that you will get into larger and more varied aggregate.
- Concrete floors are extremely low maintenance floors but understand that periodically you have to use some diamond tooling and work out the fine scratches that naturally occur. If done right, this can be implemented into the daily operations and nobody will know it’s happening….no interruptions.
By following the above tips you’ll be started down the right path to an efficient, sustainable floor. My experience as a concrete flooring consultant for major retailers and now working with a maintenance company’s to develop their concrete floor maintenance footprint has provided me the ability to see retail concrete floors from both sides of the fence. I have observed not only the efficiencies of concrete floors, but the ease of cleaning polished concrete….if the cleaning is done by a knowledgeable person and tracking systems are put into place. At the end of the day, that’s the key element…Does the person or company cleaning the floor everyday have the knowledge?
GUIDE FOR CLEANING PRODUCTS & PROCESS:
ROUTINE CLEANING
- Clean up spills as quickly as possible. Less time on your floor means less chance of stains.
- Pick up all large debris by hand.
- Sweep or dust mop entire floor. (Microfiber pads, mop’s & brooms work best)
AUTO-SCRUB CLEANING (RECOMMENDED DAILY)
Dilute New Look Nano Set Cleaner Clean / Betco Densiclean / or your neutral cleaner @ 4 oz. per gallon of clean water in auto-scrubber with moderate pressure.
- Choose pad based on manufacturer recommendations. (Use 3000 grit pad) or WHITE PADS ONLY.
- Auto scrubbing with Nano Set Cleaner (which contains Nano Silica) helps the pads polish the floor.
- Dilute Nano Set Clean 8 oz. per gallon of clean water for heavy areas of dirt and grime.
- Use a mop for hard-to-reach areas. If you don’t have an auto-scrubber, squeegee off water to dry and eliminate water marks.
* Never use vinegar, acidic or alkaline cleaners on polished Floors.
Nano Set Cleaner/Degreaser diluted 1:10 with scrubbing removes most stains. Burnish surface to fresh gloss.
Remove tape with razor blade. Be careful not to scratch surface. Denatured Alcohol will take off adhesive residue on a rag (Not fully saturated on a clean rag). Burnish to refresh gloss.
Re-Burnish & Re-Guard (NORMALLY RECOMMENDED TWICE A YEAR)
The gloss levels on ArmorX Polished Floors are affected by many factors. They include traffic, spills, inadequate cleaning, and abrasives (like dirt and sand) tracked in from outside.
Gloss is easily restored using the following procedures. High traffic areas may need burnishing more often to maintain a gloss. Biannual burnishing applications of ArmorX Guard will go a long way toward maintaining the gloss and reflectance levels the floor had when new.
Because ArmorX Guard penetrates into the concrete pores even when the gloss may have diminished from traffic, it still protects the floor from water and stain penetration.
Re-Burnish
If the floor appears to be losing some gloss, clean with Nano Set Cleaner. Then dry-run a high speed burnisher over the area of reduced gloss(3000 Buff-X Pad ONLY). There will normally be enough of the guard left on the floor that burnishing the concrete will pop the gloss back. (Remember always clean before burnishing whether you’re burnishing wet or dry without Guard. If there is dirt on the floor, burnishing will grind it in)
RE-GUARD
You can Re-Guard your floor as needed. Normally it is recommended to Re-Guard the floor twice a year. We can provide you a maintenance contract on this service (Recommended) Or we can train a person in your facility to do this for a small fee.
TESTING
Your new ArmorX floor meets certain standards for appearance and performance. Those standards were set in
the test-panel stage and confirmed upon completion of your floor. The standards met were for gloss, hardness,
and slip and water resistance. As long as you’ve followed the recommendations for the maintenance of your floor, your floor should continually meet the standards for appearance and performance.
The same tests done on your test panel will be done on your finished floor. Testing will see if your maintenance program is effective.
THE STANDARDS OF YOUR ARMORX FLOOR
Inspections in your first year should be quarterly, then annually thereafter.
Gloss Plus or minus 10% deviation from test panel
Hardness Plus or minus 10% deviation from test panel
Slip resistance >.060 (As recommended by ADA title 111 1992)
Rilem tube < 1ml loss after twenty minutes
Log inspections - Recording your inspections and recommendations will help you fine tune your floor maintenance program to get the best results with the least amount of effort.
TEST AREA
The test area is standardized for all ArmorX Floors. The floor is simply divided into 4 sections; the auditor runs
the tests in the center of each section and in the center of the floor. This ensures comprehensive evaluation of your floor conditions.
TEST KIT
ArmorX floor professionals use a standardized performance test kit to check the performance and appearance of ArmorX floors. The kit consists of precision tools needed to fully test the measurable performance of your ArmorX floor. Each kit consists of a moh hardness test kit, a gloss meter, rilem tube, optical pyrometer, and a slip meter. ArmorX professionals are fully trained in the use of the performance test kit.
THE GUARANTEE
Subject to certain conditions and limitations, the dust proofing warranty offers this guarantee:
ArmorX densifier warrants to the owner that the concrete surface on this project has been treated with the ArmorX hard densifier below; and for 25 years from the date of treatment, the surface will remain concrete dust free.if the surface fails to perform, ArmorX densifier will supply one time sufficient ArmorX hard densifier to retreat the identified area. If you have questions about your ArmorX floor’s performance contact your ArmorX applicator right away.
DUST PROOFING WARRANTY
Your ArmorX high performance finished concrete floor will not generate dust if the products are applied correctly and the floor is maintained according to the owner’s manual recommendations. if all applications and
maintenance recommendations are followed, ArmorX densifier will warrant any ArmorX floor of any size against
dusting for up to 25 years. Getting the dust proofing warranty / All ArmorX floors are eligible for the dust proofing warranty. the applicator gets the warranty certificate from ArmorX manufacture for you after completion and payment of the project.
Please call us with any regards, setting up a maintenance agreement or testing. (410) 726-3298
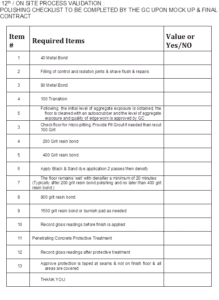
1 FLOOR AREAS TO BE POLISHED ARE TO BE FREE AND CLEAR OF ALL OBSTACLES INCLUDING RACKING, FIXTURES AND TEMPORARY EQUIPMENT AND MATERIALS IN ORDER TO PROVIDE AN OPEN AND UNINHIBITED CONCRETE SLAB.
2 PROTECTION• GENERAL CONTRACTOR SHALL PROTECT AREAS TO RECEIVE CONCRETE FINISH AT ALL TIMES DURING CONSTRUCTION TO PREVENT OILS, DIRT, METAL, EXCESSIVE WATER AND OTHER POTENTIALLY DAMAGING MATERIALS FROM AFFECTING THE FINISHED CONCRETE SURFACE. PROTECTION MEASURES LISTED BEL0"1 SHALL BEGIN I IMMEDIATELY AFTER Tl-IE CONCRETE SLAB IS POURED.
3 ALL HYDRAULIC POWERED EQUIPMENT SHALL BE DIAPERED TO AVOID STAINING OF THE CONCRETE.
4 ALL VEHICLE PARKING SHALL BE PROHBITED ON THE FINISH SLAES AREA. IF NECESSARY TO COMPLETE THEIR SCOPE OF WORK, DROP CLOTHS SHALL BE PLACED UNDER VEHICLES AT ALL TIMES. NON MARKING TIRES ONLY WITH NOTHING EMBEDDED IN TIRES LIKE SCREWS, Etc
5 NO PIPE-CUTTING MACHINE SHALL BE USED ON THE FINISH FLOOR.
- STEEL SHALL NOT BE PLACED ON THE FINISH FLOOR TO AVOID RUST STAINING
- ALL PAINTERS WILL USE DROP CLOTHS ON THE CONCRETE. NO PAINTING OVER OPEN CONCRETE SURFACES IF PAINT GETS ON THE CONCRETE, IT MUST BE IMMEDIATELY REMOVED. EDGES MUST BE COVERED TO PREVENT OVERSPRAY DUE TO EDGE GRINDING.
- NO BRACE SHOTS, NO BRAZING OR WELDING OVER OPEN CONCRETE.
- FOOD & COLORED DRINKS WILL STAIN CONCRETE SO NO EATING OR DRINKING OVER BARE CONCRETE.
- ALL TRADES WILL BE INFORMED THAT THE SLAB MUST BE PROTECTED AT ALL TIMES.
- A MINIMUM OF 25 DAYS OF CURE ON NEW CONCRETE SHOULD BE PROVIDED BEFORE SYSTEM INSTALLATION IS INITIATED.
- Tl-IE BEST DEGREE OF CONCRETE FLOOR FLATNESS AND LEVELNESS SHOULD BE STRIVED FOR SINCE THE FLOOR FINISH WONT ENHANCE IMPERFECTIONS SUCH AS HIGH AND L0W SPOTS RESULTING FROM PLACEMENT AND FINISHING. A FLOOR FLATNESS RATING OF 40 +/-S AND A FLOOR LEVELNESS OF 3S +/-S IS REQUIRED ON NEWLY PLACED CONCRETE.
- BLOCK OFF AREAS TO TRAFFIC FOR THE DURATION OF THE SYSTEM'S INSTALLATION.
- ENSURE THAT ADEQUATE LIGHTING HAS BEEN INSTALLED TO SUPPORT SURFACE PREPARATION AND APPLICATION.
- CONCRETE PROTECTION PLAN: ATTENTION
We would ask General Contractor that they include this protection plan into each trade on site as a responsibility of their employees on site and they accept liability on damages.
This concrete slab in this area will stay exposed as a finish concrete floor: Always keep the slab clean and observe the following:
No parking vehicles or equipment
No pipe cutting
No storage of any items on floor
No ferrous metals placed or stored on slab
No petroleum products or hydraulic fluid or other fluids dripping
No acidic products placed or in contact
No painting over open surface
No markers or paints
No brace shots or anchoring
No welding or brazing
No lifts or tired equipment without non marking tires and diapers under parked equipment
No debris embedded into lift tires
Water only, no food on flooring
Clean mud and abrasive material from bottom of shoes when entering area
ALL NOT BE PLACED ON THE FINISH FLOOR TO AVOID RUSTING.
contractor's requirements for an efficient Currently many architects and general contractors have little understanding of the processing and successful installation. Master Aplications, Inc has extensive experience in working with the needs of general contractors; understand how critical it is to adhere to tight schedules and the proper scheduling of other trades around the work we perform. Processing concrete requires large areas to be clear and free from all debris and other trades. Final protection is always an issue and we have several solutions to protect the floor after we have completed our work.
As soon as a job has been awarded it is important that you the general contractor award the concrete polishing to a sub contractor and set up a meeting with the architect, on site superintendent, and concrete processing contractor. It is important to determine when the processing work will be performed so that other trades are correctly scheduled. If it is new construction the meeting should also include the contractor placing and finishing the concrete, concrete supplier and anyone else who may affect the concrete work. Our results are largely dependent with what we are given to work with. When processing new concrete the concrete supplier must understand why they must strictly adhere to mix design specifications. The placement contractor needs to realize that what he is pouring and finishing is not a sub floor but the final flooring surface. There has to be a clear understanding of how to finish the concrete to get the best possible results from the polishing process. There are other intricacies the concrete processing contractor understands the GC will not be aware of. For example, if the building is block construction the thickness of the felt between the block and pour needs to be considered. To get the best possible finish along wall edges the processing work has to be performed before millwork and before door jambs are placed. Concrete processing should also be performed before paint since the equipment runs tight along walls. The most desirable time for the processor is before any interior walls have been placed although this is not always possible. When having to working around walls and tight areas this increases time spent on a job site by the polishing contractor and the finished product is never as good as it would have been if the work was performed before walls. Equipment that runs on electric has large power requirements
that need to be planed for. On new commercial jobs temporary power is rarely sufficient. It is important that all parties’ expectations are met so as you can see awarding the job as soon as possible is in the best interest of all those involved.
Regardless of if the concrete exists or new all trades need to be reminded that the concrete will be used as the finished floor and should be treat it accordingly.
SCHEDULING
- The ideal time to Polish, score (cut lines/patterns in the slab) is right after the concrete is poured -- on an open slab -- before framing begins.
- The best time to Polish stain and seal the floors is just after the structure is "dried-in" (roof on/windows in) and before the sheetrock is hung. To ready the floor for staining, simply keep the concrete swept daily and free of materials. (Make sure workers refrain from eating on your slab -- grease from french fries, hamburgers, etc. can stain your slab.)
- After the floors are stained, cover them with cardboard or thermoply to protect them from glue, marks, spills, paint, etc. (Be careful NOT to tape directly to the concrete. Tape leaves a permanent pattern on the slab.)
COLOR SELECTION
Our chart provides a representation of some of the colors available. The precise color will vary according to your concrete (its composition, the temperature when it was poured, the way it is trowelled). Be sure to ask for samples on your concrete in an area that will later be concealed by a area that’s receiving floor coverings.
PROTECTING THE FLOORS
Make sure floors are protected throughout the construction process and that you or your builder adequately supervise all subs – especially the concrete contractor -- to ensure the desired results.
- Do not use harsh detergents, acid washes, or chemicals to clean the slab. Clean the slab with water only.
- NEVER tape directly to the concrete -- this applies to before, during or after the slab is stained. (The acid on the back of the tape will etch a permanent stripe on your concrete!)
- Post warning signs For example: "WARNING. FINISHED FLOORS. KEEP COVERED AT ALL TIMES."
Instruct subcontractors to AVOID the following:
- Plumbers: PVC glues and cleaners, pipe dope, flux, pipe threading oil
- HVAC: Glues for make-up of return-air and supply ducts
- Insulators: Polyseal for doors and windows
- Sheetrockers: Sheetrock dust, TFT mud
- Painters: Paints, thinners, sealers, stains, overspray. Also, do not TAPE directly to floor.
- Framers: Red or orange chalk, permanent markers, cutting or nailing to finished concrete floor
- Have electricians locate floor plugs on drawings and flush mount the penetrations.
- Bricklayers: Muriatic acid spills and splatters.
COVERING THE FLOORS
After the floors are stained and sealed, let them dry for 24 to 48 hours. Then cover them for the remainder of construction. There are a number of good ways to cover your floors. Here's what we do:
First staple a 12" high plastic strip to the bottom 6" of the walls, curving the remaining 6" of the plastic around the edges of the concrete floor. Then cover the floors with cardboard or thermoply. Ram Board, Floor Shell (We use flat 4' x 8' cardboard sheets.) IT IS CRITICAL THAT no tape comes in direct contact with the concrete -- either before or after it is stained.
Master Applications, Inc understands the technicalities of what we do and when needed we are able to convey these technicalities to all those who affect the outcome of the processed surface. Master Application’s goal is for an efficient and successful installation.
RESULTS OF POOR PLANING THAT Master Applications, Inc CAN HELP AVOID